Friday, 28 March 2014

OCC - Embossing Paste


http://www.onlinecardclasses.com/CS3/wp-content/uploads/2014/02/CS3_paticipant.png

EMBOSSING PASTE

Embossing paste is an easy way to add texture to a project.  I didn't have any so with the help of google I made my own.
 

I laid down a stencil and just spread the paste over it.  Sprinkled some ultra fine glitter for some shimmer and lifted the stencil. Easy peasy.  It didn't take too long to dry too.  Then I finished the card with some washi tape (I love this tape), a handwritten sentiment, and some rhinestones.

I was having so much fun with the paste that I decided to make another card.  This time I did the opposite.  Instead of using a stencil to create a textured image, I used a die-cut butterfly as a mask.  I just temporarily adhered the butterfly to the card, picked up a glob of paste with my spatula and smeared it right over the the butterfly.  Of course I had to sprinkle some ultra fine glitter over the paste again.  Then I carefully lifted the mask and ta da!! A butterfly set in textured background!


Finished the card with some glitter to the sides, an embossed sentiment, and a large heart rhinestone in the center of the butterfly.

 Okay got to hurry and link up this homework before classes close.
Thanks for visiting.
Phi

Challenges:
Crafts 4 Eternity #169 - Special Mums
Moxie Fab World - Stencils
A Creative Romance  - Spring flowers
Creative Knockouts #30 - Texturize it
Crafty Catz #224 - Anything goes
4 Krafty Girls challenge #14 - Anything goes


OCC - Days 9 & 10 - Textural Effects


http://www.onlinecardclasses.com/CS3/wp-content/uploads/2014/02/CS3_paticipant.png

DRY EMBOSSING


On day 9 we were shown how to do some selective embossing using embossing folders and dies.  Basically you use the die to mask an area of the embossing folder so you get a framed area amongst the embossing that is flat.  It only works if your die has a solid back and not an open one.  I didn't have a frame die with a solid back so I just used an open one for the shape of the frame.  Inside the frame I place two smaller dies which did have solid backs.  Since I didn't have a flat frame where I can perhaps stamp a sentiment or an image I embossed one with little gingerbread man/woman dies.  Worked out beautifully.


The card was finished off with some washi tape and a little heart covered with glossy accents.

Thank you for joining me today.
Smiles
Phi

Challenges:
Creative Knockouts #30 - Texturize it
Crafty Catz #224 - Anything goes
4 Krafty Girls challenge #14 - Anything goes
Craftying for all Seasons Challenge #73 - No Designer Papers
DL. Art Thankful Thursday March Linky Challenge - Anything goes


Wednesday, 26 March 2014

OCC - Watercolour Made Easy


http://www.onlinecardclasses.com/CS3/wp-content/uploads/2014/02/CS3_paticipant.png
  
WATERCOLOUR MADE EASY

Okay, last card from me today and I better get cracking on days 9 and 10.

On day 7 Jennifer Rzasa shared some great tips to make watercolouring easier.  I found them to be a great help as I'm a beginner with watercolour.


First I painted the basic shape of my feather with just plain water so when I come in with the watercolour, the paint will run along the already wet areas allowing the colour the spread.  Then I go in with a smaller brush with fresh paint for the finer details.  I'm not sure if I'm explaining it correctly but it has sure been fun.  Again, with many of these new techniques I'm learning, I had to do it a few times to get the hang of it.  Free hand painting can be scary.


As you can see my feather is not perfect.  But you can tell its a feather right?

Thanks for joining me today.
Hope you enjoyed my card.
Phi

Challenges:
Crafts 4 Eternity #168 - Anything goes
613 Avenue Create #64 - Anything goes/twist - Birds of a feather
Challenges 4 Everyboday #39 - Anything goes


YAY!! Made top 3 at Crafts 4 Eternity #168


Woohoo! Came 1st in the Crafty Boots Challenge


1st place badge


OCC - Tracing Images


http://www.onlinecardclasses.com/CS3/wp-content/uploads/2014/02/CS3_paticipant.png

TRACING IMAGES

On day 8 I was so inspired by Kathy Rocoosin's card that I knew I had to try it.  This technique is so simple but I really have never thought of it before.


First you stamp your image on your card with very light ink.  Kathy used a big beautiful floral background stamp on her card but since I don't own any similar stamp I stamped my card with a few different stamps to create a floral background.  Then using a silver glittery gel pen I traced the lightly stamped image.  You can either trace a portion or the whole image.  I chose to trace the whole image.  Then I went in and coloured with my copics.  The gel pen gives it a touch of elegance and shimmer.


I am very pleased with this card.  The copics actually picked up the shimmer from the gel pen and spread a dusting of the shimmer throughout the whole card.  Too bad the pictures did not pick up on that.  I enjoyed this technique a great deal and will definitely be using it again.

Have a wonderful day and thank you for viewing my creations.
Smiles
Phi

Challenges:
Simon Says Stamp Work It Wednesday - Spring - Bright colours, flowers, sunshine
Crafty Catz #223 - Bling it up - Used a glitter silver gel pen
Crafts 4 Eternity #168 - Anything goes
Bearly Mine March Challenge - One for the Girls
The Paper Shelter #151 - Spring delights
Through the Craftroom Door - Anything goes


OCC - Days 7 & 8 - Creattive Colouring

http://www.onlinecardclasses.com/CS3/wp-content/uploads/2014/02/CS3_paticipant.png


SIMPLE COPIC COLOURING

Day 7 of classes Kristina Werner shows us a simple way to add colour with copics on vellum.


Just add bands of colour with your copics on vellum and have them show through your die cut card front.  Doesn't the colours look amazing!! I used the Dog Tag Die-namics from My Favorite Things and made a chain of liquid pearls.

I love how this card turned out.  There is only one problem.  I am stumped for a sentiment.  I have searched through my whole stamp collection (which isn't very large) and could not find anything I want to put on there.  Will have to keep a lookout for the perfect sentiment.  Any suggestions??

Hope you enjoyed my card.
Big Smiles
Phi

Challenges:
Simon Says Stamp Monday Challenge - Transparent
DL. Art Thankful Thursday March Linky Challenge - Anything goes
Simon Says Stamp Work It Wednesday - Spring - Bright colours, flowers, sunshine
Little Red Wagon #229 - Rainbow of colours
Crafty Catz #223 - Bling it up - Used liquid pearls
Artistic Inspirations #84 - Anything goes
Lexi's Creations #112 - Punches and Dies
Crafts 4 Eternity #168 - Anything goes

Tuesday, 25 March 2014

OCC - Graffiti Stamping


 http://www.onlinecardclasses.com/CS3/wp-content/uploads/2014/02/CS3_paticipant.png


GRAFFITI STAMPING

A very easy and fun technique.  Just grab a bunch of sentiment stamps and stamp them all together.  Add a few different colours for interest and your card is done.  But be warned...this kind of stamping is addictive and it took everything I had to stop stamping on this card.


The hardest part of this technique is collecting different but coordinating sentiment stamps.  I did struggle with this card as I realized I don't nearly have enough sentiment stamps.  Going to have to save up and rectify that.

Thank you so much for visiting.
Phi

Challenges:
Just B Creative Crazy - March Just Because Linky party


Monday, 24 March 2014

OCC - Masked background


MASKED BACKGROUND

For this card I used tape to mask the background into strips to form a plaid pattern.  I have used all different shades of green.  However, I got lazy and used the back of some clear border stamps instead of inking.  So the stripes turned out a bit wonky.  I guess it would also help if my ink pads were not so old and a bit more juicier. Lastly I added some green and silver glitter for some bling.


Thank you for visiting today.
Smiles
Phi


Challenges:
 Addicted to CAS #34 - Luck
Crafty Catz #223 - Bling it up
Simon Says Stamp Wednesday Challenge - Glitter it
Bunny Zoe's Crafts March Challenge - Monochrome
Challenges 4 Everybody #39 - Anything goes


OCC - Days 5 & 6 - Iron Off Embossing


http://www.onlinecardclasses.com/CS3/wp-content/uploads/2014/02/CS3_paticipant.png Hello Friends,


More of my cards for Clean and Simple 3 classes.  Days 5 & 6 is all about bringing the backgrounds into the foreground.


IRON OFF EMBOSSING

First up is the iron off embossing technique.


First, the space where I wanted to add colour was masked off.  Then, I inked the rest of the area with versamark and embossed with white embossing powder.  I then stamped the moose/deer and star also with versamark and embossed as well.  When I have all my embossing in place I painted all the unembossed areas with watercolour.  After the watercolour have dried I removed the embossing with an iron.

It took a few tries before I got my desired card.  A very labour intensive technique but the results are stunning when you get it right.  I haven't got it completely right yet but a beautiful result for a beginner with iron off embossing and watercolour.

Hope you like my card.
I will be sharing more of my OCC cards shortly.
Thanks for stopping by.
Phi

Challenges:

Completely Christmas #4 - Anything goes
Runway Inspired Challenge #56 - I was inspired by the colours on the model's skirt

Monday, 17 March 2014

OCC - Days 3 & 4 - Scenic Stamping


http://www.onlinecardclasses.com/CS3/wp-content/uploads/2014/02/CS3_paticipant.png 


SCENIC STAMPING


It was really easy to create the scene on this card with the illusion of depth and distance by simply adding a horizon line under your stamped images.  I cannot believe how simple it was to put a few stamps together, add some painted lines and create an adorable little scene!!  Love it!!

Oh, and if anyone recognize the little hedgehogs on the sleigh stamp, please let me know who makes them.  I don't have the packaging anymore and would love to know the maker.

Going to go catch up on days 5 and 6 now.
Hope to see you again soon.
Phi

Challenges:

Crafty Hazelnuts Challenge #168 - Going green, a little or a lot
Crimbo Crackers #60 - Cute Christmas
Crafty Calender Challenge - March - Animal Antics
A little bit of Crafty - Are we there yet?
Crafty Hazelnuts Christmas challenge extra for March
Stempelgarten Challenge #23 - One Layer card

OCC - More Masking

http://www.onlinecardclasses.com/CS3/wp-content/uploads/2014/02/CS3_paticipant.png 


I am having so much fun with masking that I decided to share another card with you using this technique.


The mask was made with a Spellbinders Classic Hearts die cut.  I cut the heart out, temporarily stuck it to the card and stamped all over it.  Then I peeled the heart mask off and stamped the sentiment.  

The masking on this card turned out so much better than my last attempt.  I wonder if it's because I used clear stamps for this one where as I used wooden stamps on my last make.  I think the clear stamps were able to get closer to the edge of the mask?  I'm not sure but its the only thing I can think of.

I can sit here and play with this technique all day.  So easy and fun to do.

Thanks for visiting
Phi

Challenges:
Less is More #163 - Masking or stencilling
CAS on Sunday #29 - One Layer Wonder
Simon Says Stamp Wednesday Challenge - Mother's Day or Special Girl
Stamping Sensations March challenge - Pretty in pink
Allsorts  #250 - Pretty in Pink


OCC - Days 3 & 4 - Masking


http://www.onlinecardclasses.com/CS3/wp-content/uploads/2014/02/CS3_paticipant.png
Hello friends,


I am so behind in my classes it's not funny.  Day 7 is out and I have just completed days 3 and 4.  Better get a move on.


Days 3 and 4 are all about optical illusions.


MASKING


I have used masking on this card to create an illusion of a frame around the areas I stamped.


The mask was made out of simple computer paper.  I first sponged blue ink for the clouds, then stamped the balloons on top, slightly overlapping.  Last, I drew in the strings before removing the mask and stamping the sentiment.

The sentiment is from a My Favorite Things stamp set called "Celebrate Big".  The balloons are from different Stampin Up! sets.

Have a nice day
Phi

Challenges:

Less is More #163 - Masking or stencilling


Thursday, 13 March 2014

OCC Clean & Simple - Faux Letterpress


http://www.onlinecardclasses.com/CS3/wp-content/uploads/2014/02/CS3_paticipant.png


Okay, one more card/s to share today.


FAUX LETTERPRESS

The following cards were created using the faux letterpress technique.  With this first card, I stamped the motif in white ink.  Then stamped the image again in blue/green ink over the white and slightly offset.  This creates the impression that the image is raised off the page....well it should anyway. What do you think? Maybe it didn't work as well as I intended.....


so...I tried again stamping versamark first then white ink on top....


and.....much better don't you think?  But perhaps the grey cardstock and white ink didn't do this technique justice so I tried again.


I tried versamark and white ink again but on kraft card.  Then white ink and blue on kraft card.  And I think both of these look great.  Pops right out of the page!!

  I left these cards with no sentiments yet so I can pull them out when I need.  Any sentiment will look great with these. 

I had so much fun with this technique.  And now I have a whole set of cards ready to go.


Okay, that is it from me today.
I'm late for day 3 and 4 of classes.
See you again soon
Phi

Challenges:
Runway Inspired Challenge #55 - I was inspired by the large motif on her dress taking center stage.
Inspired by Stamping IBSIC#79 - White, blue green, emerald green
Inky Chicks#24 - Monochromatic


OCC - Clean & Simple 3 - Faux Layered Die-cuts


 http://www.onlinecardclasses.com/CS3/wp-content/uploads/2014/02/CS3_paticipant.png


Now on to the next technique I learnt from Clean & Simple 3 classes...


FAUX LAYERED DIE-CUTS


 This card was created using the faux layered die-cuts technique.  For this technique you cut out the die-cuts right on your card front then layer the die-cuts back into the recesses.  It gives you a layered look while keeping your card one-layered.  It's brilliant and the outcome is so pretty.

The card was finished off with a few dots of glossy accents for some subtle flower centers.

I will be creating and sharing more cards for the classes.
Hope to see you here again soon.
Phi

Challenges:
Addicted to Stamps Challenge#86 - Anything goes
Simon Says Stamp Wednesday Challenge - Mother's Day or Special Girl
Inspired by Stamping IBSIC #80 - White, sand, coral
Less is More #162 - One Layer Card - Spring flowers


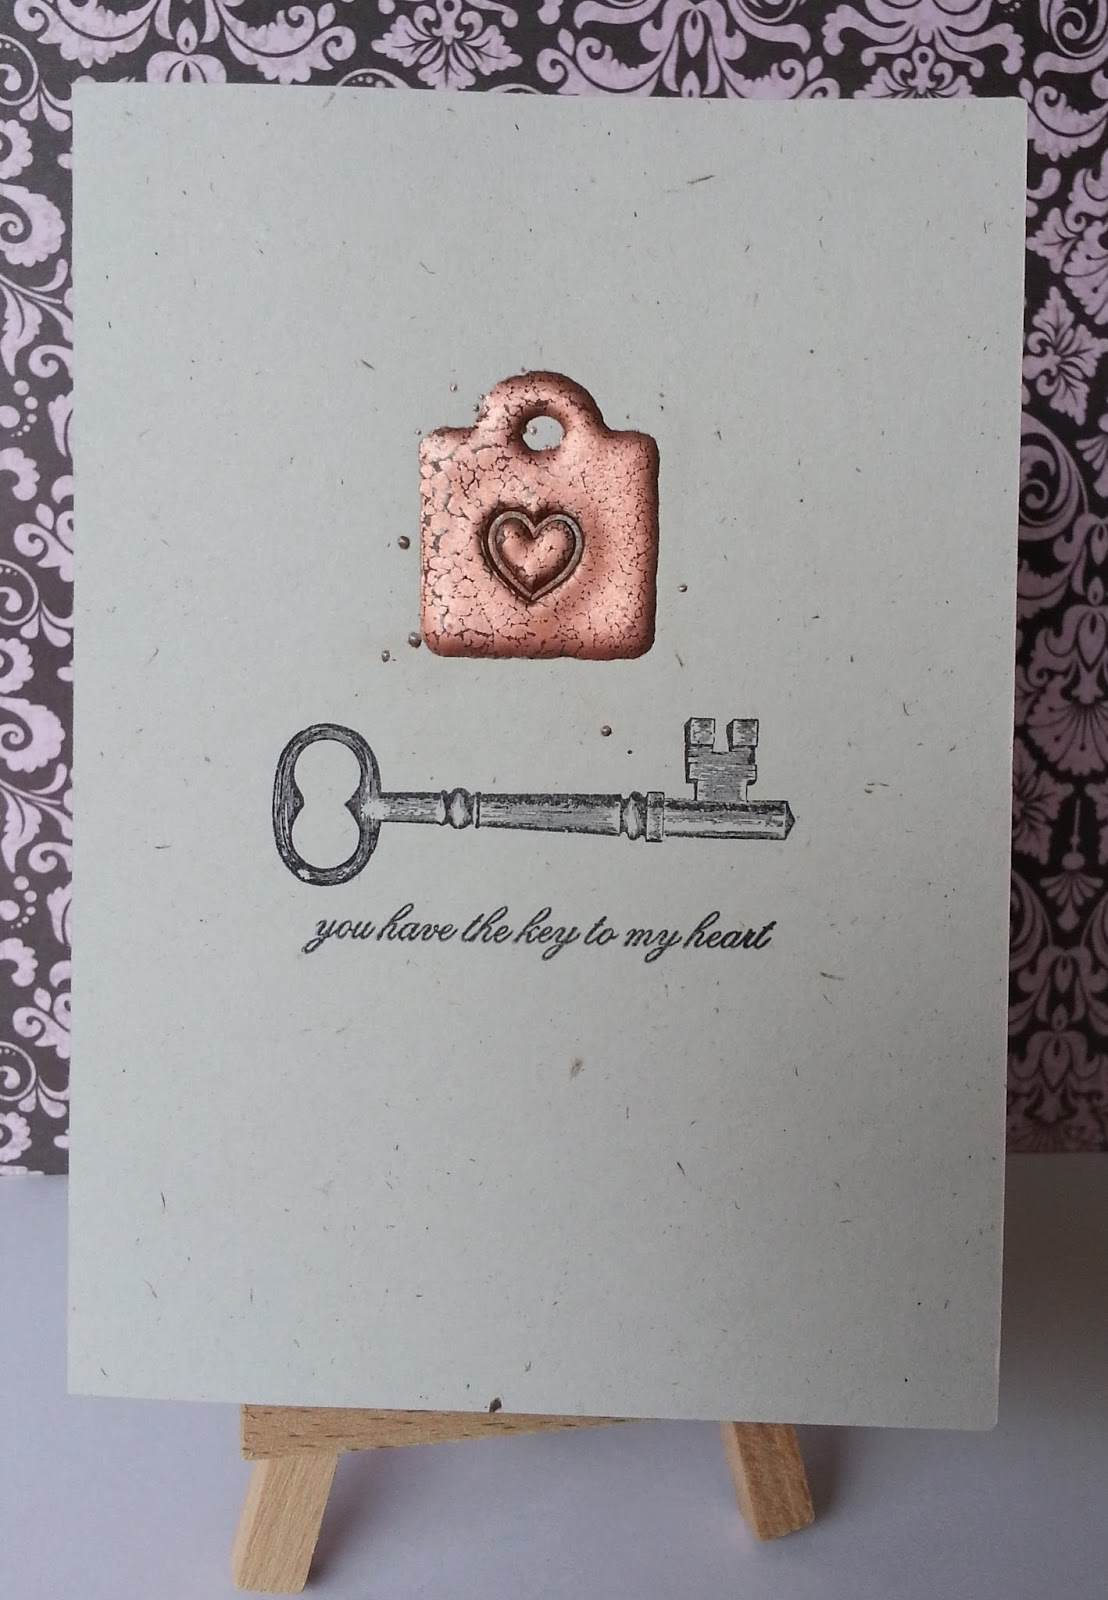
OCC Clean & Simple 3 - Faux Metal


http://www.onlinecardclasses.com/CS3/wp-content/uploads/2014/02/CS3_paticipant.pngHi Everyone,


For the first time ever I'm joining in on Online Card Classes.  For day 1 and 2 we are learning about different faux effects.


FAUX METAL


For my homework I created this card...


For the lock I used a tag die that resembles the shape of a lock to create a stencil/mask.  Then applied versamark and 3 layers of thick copper embossing powder. Before the last layer of embossing cooled I imprinted the heart with a stamp.  I was so happy with the result I was giggly with glee.  I love the crackly distressed look this embossing powder gives.  I even love the stray powder that flicked around abit leaving random specks around the lock.

I have a few more makes to share then I need to get back to creating with the classes.
Thanks for visiting today.
Phi


Challenges:

DL.ART Thankful Thursday Challenge #128 - Use an uplifting sentiment (5 words or more)


Saturday, 8 March 2014

Christmas / Just for You

Hello Crafters,


I was beginning to colour up a stamp called Sugarplum Faery by Whimsy stamps, when my daughter came into my craft room and said "colour her pink"....so I did.  Originally I intended to make a Christmas card.  But my daughter decided she wanted a Just for You card.  So I made a pink Christmas Just for You card.....if that makes sense.


For the layout of the card I followed a sketch from Sketchy Colors.  The sentiment reads "A special wish just for you".  The card was finished off with some silver Glitzee glitter glue, silver trimmed ribbon, and pink rhinestones.


That's it from me today.
Thank you for dropping by.
Phi


Challenges:

Crafty Ribbons #79 - Anything goes with ribbon
Inky Chicks#24 - Monochromatic
The Paper Shelter #148 - Anything goes
Sparkles Christmas Challenges #38 - More than 3 embellishments - Glitter, ribbon, 8 rhinestones
One Crazy Stamper March Challenge - Anything goes and Whimsy Stamps
Kit and Clowder March Challenge - Wings
Stamping Sensations March challenge - Pretty in pink
Vintage Stamping Challenge #18 - Just for You
Crafty Hazelnuts Christmas challenge extra for March
Completely Christmas Challenge #2 - Anything goes